
Table of Contents
Arduino is a popular open-source electronics platform that can be used to control robots. With the advancement of technology, smartphones have become a ubiquitous part of our lives. Combining the power of an Arduino board and a smartphone, we can build an Android Apps controlled robot using Arduino. In this article, we will explore how to build an Android Apps controlled robot using Arduino.
It is the special type of Robot which is controlled via Android phone using special Apps. Here we use Bluetooth for the communication between Robot and the Remote (i.e Mobile).
Robot changes its direction according to the instruction given to it.
Bluetooth is the standard Wireless technology used for exchange the data over the short distance.
Component Required :-
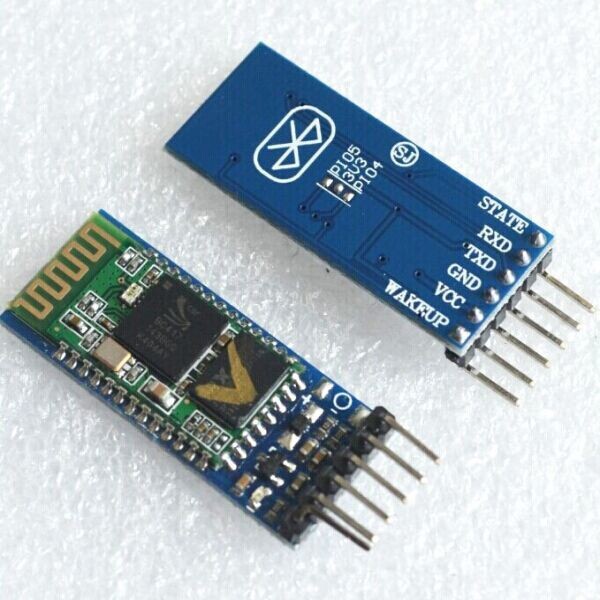
- Bluetooth Module[HC05]
- Arduino UNO
- Motor Driver
- Motors
- Wheels
- Robot Chasis
- Jumper Wires
Software Requirements:
- Arduino IDE – For programming Arduino
- Android Smartphone – With Bluetooth capability
- Bluetooth Controller App – (Available on Play Store or custom-built)
Here we use Bluetooth module HC05 for sending the data from Transmitter device. It is easy to use SPP (Serial Port Protocol) module which is designed for transparent wireless serial connection setuo. It uses 2.45 GHz frequency band.The transfer rate of the data can be vary up to 1mbps and is range of 10M. It has 6 pins but we use only 4 out of 6 pins they are VCC,GND,TX,RX.
Also Read other arduino project
VCC and GND are used for power supply and TX and RX for transmitting and receiving the data.

Connect the circuit as shown in the figure
Output From The motor driver to 6,7,8,9 pin of Arduino. RXD and TXD pin to the 10,11 pin of Arduino.
Code :-
#include <SoftwareSerial.h>
SoftwareSerial myserial(10,11);
int lm1=6;
int lm2=7;
int rm1=8;
int rm2=9;
void setup()
{
pinMode(lm1,OUTPUT);
pinMode(lm2,OUTPUT);
pinMode(rm1,OUTPUT);
pinMode (rm2,OUTPUT);
Serial.begin(9600);
myserial.begin(9600);
myserial.println("connect A B C or any other");
}
void loop()
{
if (myserial.available())
{
     int val=myserial.read();
      Serial.println(val);

if(val=='A')
 {
      digitalWrite(lm1,HIGH);
      digitalWrite(lm2,LOW);
      digitalWrite(rm1,HIGH);
      digitalWrite(rm2,LOW);
      Serial.println("\n Moving Forward");
 }
 else if(val=='B')
 {
      digitalWrite(lm1,LOW);
      digitalWrite(lm2,HIGH);
      digitalWrite(rm1,LOW);
      digitalWrite(rm2,HIGH);
      Serial.println("\n moving backward");
 }
 else if(val=='C')
 {
      digitalWrite(lm1,HIGH);
      digitalWrite(lm2,LOW);
      digitalWrite(rm1,LOW);
      digitalWrite(rm2,HIGH);
      Serial.println("\n moving left");
 }
 else if(val=='D')
 {
    digitalWrite(lm1,LOW);
    digitalWrite(lm2,HIGH);
    digitalWrite(rm1,HIGH);
    digitalWrite(rm2,LOW);
    Serial.println("\n now moving right");
 }
 else
{
  digitalWrite(lm1,LOW);
  digitalWrite(lm2,LOW);
  digitalWrite(rm1,LOW);
  digitalWrite(rm2,LOW);
  Serial.println(" \n now stop");
}
}
}There are various types of Android apps available in play store, you can download any one of them to control the robot.


5 Comments
Leave a Comment