Table of Contents
Introduction
Have you ever wanted to control another computer remotely—whether for IT support, collaboration, or accessing your home PC? In this step-by-step guide, you’ll learn how to build a fully functional remote desktop application using C# and TCP networking—one of the most reliable protocols for real-time communication.
Understanding TCP Client-Server Communication
TCP (Transmission Control Protocol) is a connection-oriented protocol that ensures:
✔ Reliable Data Delivery – No packets are lost (unlike UDP)
✔ Ordered Data Transmission – Data arrives in the correct sequence
✔ Error Checking – Automatic retransmission if corruption occurs
In our application:
- The Host (Server) listens for incoming connections and streams its screen.
- The Client (Controller) connects to the host and sends input commands (mouse/keyboard).
🚀 By the end of this tutorial, you’ll have:
✔ A TCP server (host) that streams its screen
✔ A TCP client (controller) that sends mouse/keyboard inputs
✔ Real-time screen sharing with JPEG compression
✔ Remote control capabilities (mouse movements, clicks, keystrokes)
Perfect For:
- IT Support – Fix issues on remote PCs
- Home Automation – Control a media center PC
- Educational Projects – Learn networking & C#
🔧 Prerequisites
Before we start, ensure you have:
- Visual Studio 2022 (or newer)
- Basic C# & .NET knowledge
- Two PCs (or VMs) for testing
Part 1: Building the Host (Server) Application
The host application runs on the PC being controlled. It:
- Listens for incoming connections
- Captures and sends screenshots
- Accepts remote input commands
Key Code Snippets
1. Starting the TCP Server
The TCP server is being initialized and started. The method first sets a specific port number (5000) where the server will listen for incoming client connections.
private void StartServer()
{
    int port = 5000;
    server = new TcpListener(IPAddress.Any, port);//ip address
    server.Start();
    isListening = true;

    listenerThread = new Thread(ListenForClients);
    listenerThread.IsBackground = true;
    listenerThread.Start();

    Log($"[Host] Server started on port {port}");
}2. Handling Client Authentication
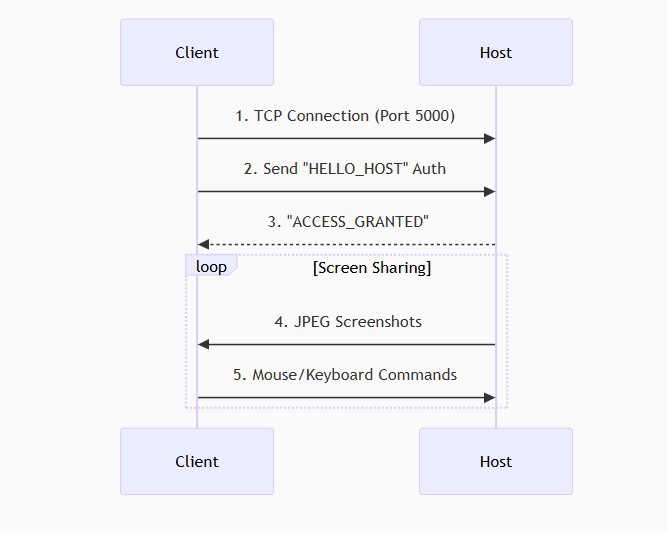
The server continuously listens for incoming client connections. When a client connects, it reads an authentication message (preceded by its length), and verifies whether the client sends a correct handshake message (HELLO_HOST). Depending on the message, it responds with either ACCESS_GRANTED or ACCESS_DENIED. If authenticated, it starts a background thread to handle further data (like receiving screenshots); otherwise, it closes the connection.
 while (isListening)
 {
     try
     {
         client = server.AcceptTcpClient();
         Log("[Host] Client connected.");

         stream = client.GetStream();

         // Read auth message length
         byte[] lengthBuffer = new byte[4];
         int lenRead = stream.Read(lengthBuffer, 0, 4);
         if (lenRead != 4)
         {
             client.Close();
             continue;
         }
         int authLength = BitConverter.ToInt32(lengthBuffer, 0);

         // Read auth message
         byte[] authBuffer = new byte[authLength];
         int totalRead = 0;
         while (totalRead < authLength)
         {
             int read = stream.Read(authBuffer, totalRead, authLength - totalRead);
             if (read == 0) break;
             totalRead += read;
         }
         string clientMessage = Encoding.UTF8.GetString(authBuffer);
         Log($"[Host] Received: {clientMessage}");

         string response = clientMessage == "HELLO_HOST" ? "ACCESS_GRANTED" : "ACCESS_DENIED";

         // Send response length + response
         byte[] respBytes = Encoding.UTF8.GetBytes(response);
         byte[] respLen = BitConverter.GetBytes(respBytes.Length);
         stream.Write(respLen, 0, 4);
         stream.Write(respBytes, 0, respBytes.Length);
         Log($"[Host] Sent: {response}");

         if (response == "ACCESS_GRANTED")
         {
             // Start receiving screenshots & handle input
             receiveThread = new Thread(ReceiveDataLoop);
             receiveThread.IsBackground = true;
             receiveThread.Start();
         }
         else
         {
             client.Close();
         }
     }
     catch (Exception ex)
     {
         Log("[Error] " + ex.Message);
     }
}3. Picturebox update
Method safely updates a PictureBox control (pictureBox1) with a new image. If the update is being called from a non-UI thread, it uses Invoke to marshal the update to the UI thread. Once on the correct thread, it disposes of the previous image (to free resources) and sets the new image to display in the PictureBox.
 private void UpdatePictureBox(Image img)
 {
     if (pictureBox1.InvokeRequired)
     {
         pictureBox1.Invoke(new Action<Image>(UpdatePictureBox), img);
     }
     else
     {
         pictureBox1.Image?.Dispose();
         pictureBox1.Image = new Bitmap(img);
     }
}Part 2: Building the Client (Controller) Application
The client connects to the host and:
- Receives live screen updates
- Sends mouse/keyboard inputs
Key Code Snippets
1. Connecting to the Host
when the button is clicked, the client attempts to connect to a host server using a TCP connection on port 5000. It sends an authentication message (HELLO_HOST) with a length prefix and waits for the server’s response. Based on the server’s reply (ACCESS_GRANTED or ACCESS_DENIED), it either starts background threads for screen sharing and input handling or shows a failure message and cleans up the connection.
  private void button1_Click(object sender, EventArgs e)
  {
      ConnectToHost();
  }

  private void ConnectToHost()
  {
      string hostIp = "***.***.***.***"; // 🔧 Replace with Host IP
      int port = 5000;

      try
      {
          client = new TcpClient();
          client.Connect(hostIp, port);
          stream = client.GetStream();

          // Send AUTH message with length prefix
          string authMsg = "HELLO_HOST";
          byte[] authBytes = Encoding.UTF8.GetBytes(authMsg);
          byte[] authLen = BitConverter.GetBytes(authBytes.Length);
          stream.Write(authLen, 0, 4);
          stream.Write(authBytes, 0, authBytes.Length);

          // Read response length and response
          byte[] respLenBuf = new byte[4];
          int read = stream.Read(respLenBuf, 0, 4);
          if (read != 4)
          {
              Log("Failed to read response length");
              return;
          }

          int respLen = BitConverter.ToInt32(respLenBuf, 0);
          byte[] respBuf = new byte[respLen];
          int totalRead = 0;
          while (totalRead < respLen)
          {
              int r = stream.Read(respBuf, totalRead, respLen - totalRead);
              if (r == 0) break;
              totalRead += r;
          }
          string response = Encoding.UTF8.GetString(respBuf);
          Log("[Client] Server Response: " + response);

          if (response == "ACCESS_GRANTED")
          {
              MessageBox.Show("Access Granted by Host!", "Connection Successful", MessageBoxButtons.OK, MessageBoxIcon.Information);

              running = true;
              sendThread = new Thread(SendScreenLoop);
              sendThread.IsBackground = true;
              sendThread.Start();

              receiveThread = new Thread(ReceiveInputCommands);
              receiveThread.IsBackground = true;
              receiveThread.Start();
          }
          else
          {
              MessageBox.Show("Access Denied by Host.", "Connection Failed", MessageBoxButtons.OK, MessageBoxIcon.Warning);
              Cleanup();
          }
      }
      catch (Exception ex)
      {
          Log("[Client] Error: " + ex.Message);
          MessageBox.Show("Connection Error:\n" + ex.Message, "Error", MessageBoxButtons.OK, MessageBoxIcon.Error);
          Cleanup();
      }
}2. Receiving & Displaying Screen Updates
The client continuously captures screenshots of the primary display, compresses them to JPEG format, and sends them to the host over the network connection. Each image is sent with a length prefix to ensure proper transmission. This loop runs in the background while the connection is active, with a slight delay to control the frame rate (approx. every 200ms).
 private void SendScreenLoop()
 {
     try
     {
         while (running && client.Connected)
         {
             using (Bitmap bmp = new Bitmap(Screen.PrimaryScreen.Bounds.Width, Screen.PrimaryScreen.Bounds.Height))
             {
                 using (Graphics g = Graphics.FromImage(bmp))
                 {
                     g.CopyFromScreen(0, 0, 0, 0, bmp.Size);
                 }

                 using (MemoryStream ms = new MemoryStream())
                 {
                     bmp.Save(ms, ImageFormat.Jpeg); // compress screen image to jpeg
                     byte[] imgBytes = ms.ToArray();

                     // Send image length prefix
                     byte[] lenBytes = BitConverter.GetBytes(imgBytes.Length);
                     stream.Write(lenBytes, 0, 4);

                     // Send image bytes
                     stream.Write(imgBytes, 0, imgBytes.Length);
                     stream.Flush();
                 }
             }
             Thread.Sleep(200); // Adjust for desired FPS
         }
     }
     catch (Exception ex)
     {
         Log("[SendScreenLoop] Error: " + ex.Message);
         running = false;
     }
}3. Sending Mouse/Keyboard Commands
The client continuously listens for incoming input commands from the host. Each command is received with a length prefix to ensure the complete message is read correctly. Once a full command is received, it is decoded and passed to a method that processes the input (like mouse or keyboard events). The loop runs while the connection is active and cleans up on error or disconnection.
 private void ReceiveInputCommands()
 {
     try
     {
         while (running && client.Connected)
         {
             // Read length of incoming command
             byte[] lenBuf = new byte[4];
             int read = stream.Read(lenBuf, 0, 4);
             if (read != 4) break;

             int cmdLen = BitConverter.ToInt32(lenBuf, 0);
             if (cmdLen <= 0) break;

             byte[] cmdBuf = new byte[cmdLen];
             int totalRead = 0;
             while (totalRead < cmdLen)
             {
                 int r = stream.Read(cmdBuf, totalRead, cmdLen - totalRead);
                 if (r == 0) break;
                 totalRead += r;
             }
             string command = Encoding.UTF8.GetString(cmdBuf);

             ProcessInputCommand(command);
         }
     }
     catch (Exception ex)
     {
         Log("[ReceiveInputCommands] Error: " + ex.Message);
         running = false;
     }
     finally
     {
         Cleanup();
     }
}3. Download the source code
Click here to download the source code
4. DEMO video
Also Read | How to open PDF/PPT File in Visual c# app


0 Comments
Be the first to comment!
Leave a Comment