
In this tutorial, we will bridge the gap between low-cost IoT hardware (camera module) and powerful desktop processing. We’ll use an ESP32-CAM to stream live video over Wi-Fi and create a C# Windows Forms application that processes that stream to detect colors in real-time.
The Project Overview
The goal is to capture a video stream from an ESP32-CAM, decode the MJPEG (Motion JPEG) format manually in C#, and use the HSV (Hue, Saturation, Value) logic to identify if the camera is looking at Red, Green, Blue, White, or Black.
Key Technologies:
Hardware:
- ESP32-CAM module (AI-Thinker or similar)
- USB cable
- Wi-Fi network (2.4 GHz)
Software:
- Arduino IDE (to flash the ESP32 camera firmware)
- Visual Studio 2019 or later (Community edition is free)
- .NET Framework 4.7.2 or higher
How It Works
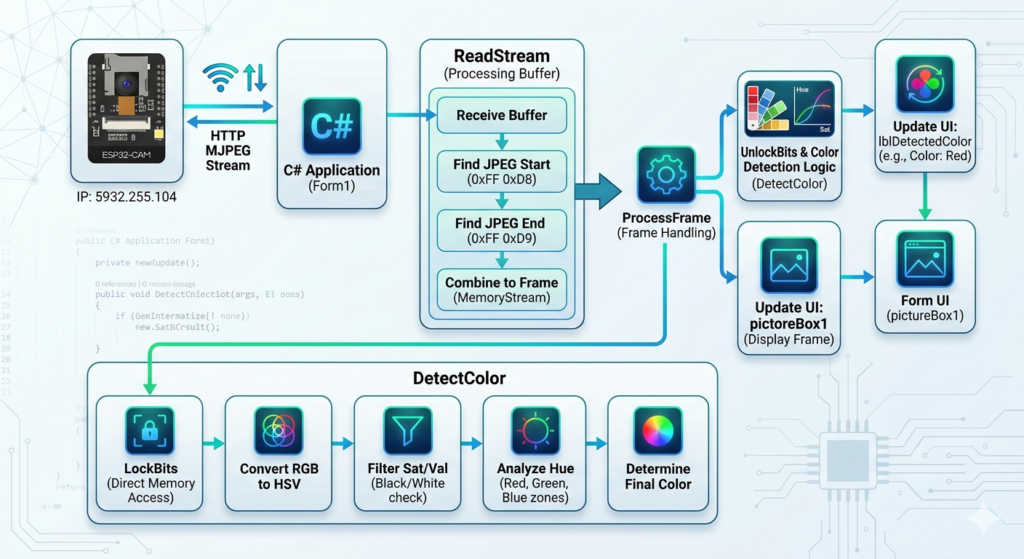
Before diving into the code, here is a simple overview of the entire system:
- The ESP32-CAM captures video and streams it as MJPEG (Motion JPEG) over HTTP on your local Wi-Fi network.
- The C# desktop app connects to the ESP32 using its IP address and reads the HTTP stream.
- Each JPEG frame is decoded into a Bitmap image.
- The app analyzes the pixels in the center of the image and calculates which color dominates.
- The detected color name (Red, Green, Blue, White, or Black) is displayed live on screen.
The whole process happens frame by frame, many times per second, giving you a live color readout.
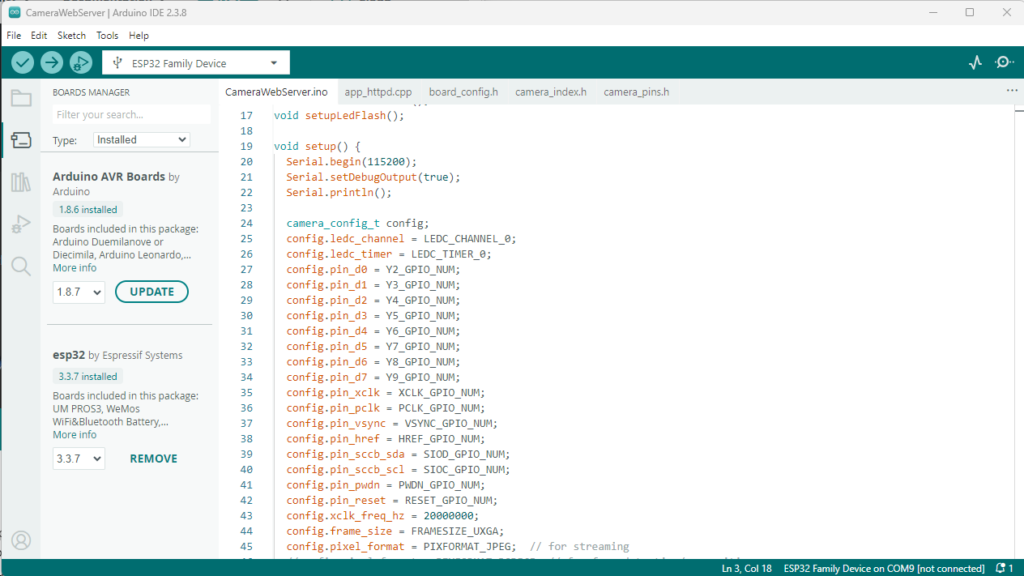
Program For Camera Module
- Download the library file gor Esp32 from board manager
- Select the appropriate board Tools->boards->esp32(For now ESP32 Family Device)
// ===========================
const char *ssid = "WIFI-NAME";
const char *password = "PASSWORD";
Replace the SSID name and Password by your Wifi username and password. and upload the code to the Camera Module.
Program For Application
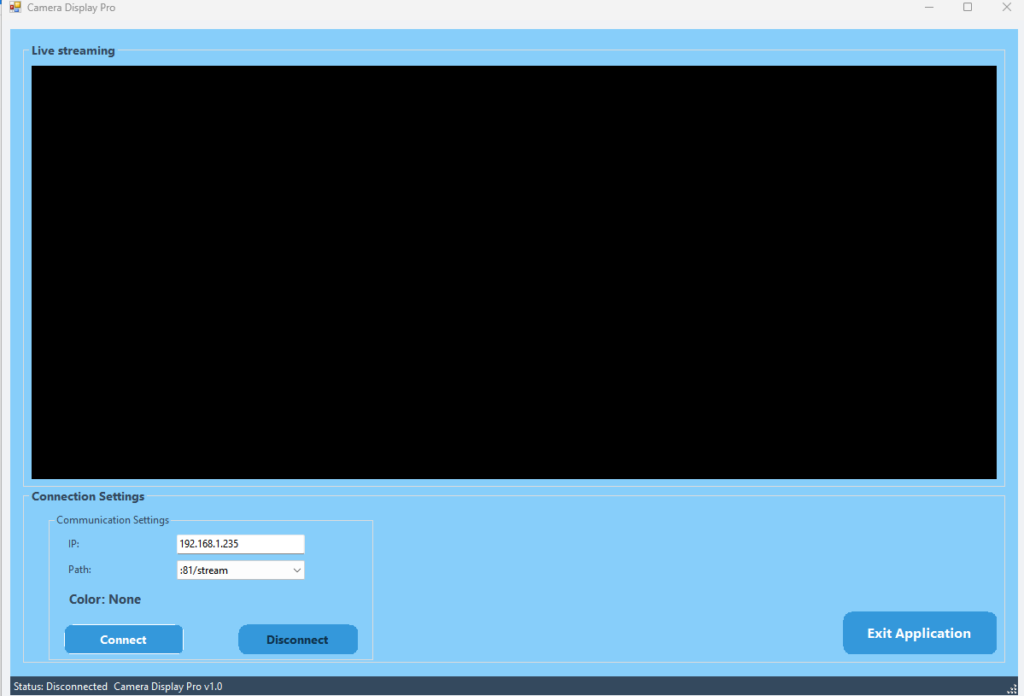
The application is built with Windows Forms (WinForms) in C#. It features a simple, intuitive layout: a live video display at the top, connection controls at the bottom, and a color label that updates in real-time.The app logic is split into four key parts. Let’s walk through how they work together.
🔗 Connecting to the Camera Stream
The app uses the built-in HttpClient to open a long-lived HTTP connection to the ESP32. The URL is constructed dynamically: http://{IP address}{stream path}
The response is a continuous stream of JPEG images. The app reads this stream byte by byte, searching for the JPEG start marker (0xFF 0xD8) and end marker (0xFF 0xD9) to “slice” out each individual image frame.
📸 Reading the MJPEG Stream
        private async Task StartStream(string url, CancellationToken token)
        {
            try
            {
                var response = await _httpClient.GetAsync(url,
                    HttpCompletionOption.ResponseHeadersRead, token);
                var stream = await response.Content.ReadAsStreamAsync();
                await ReadStream(stream, token);
            }
            catch
            {
                ShowError("Connection failed. Check the IP address and path.");
            }
        }

        private async Task ReadStream(Stream stream, CancellationToken token)
        {
            MemoryStream ms = new MemoryStream();
            byte[] buffer = new byte[8192];
            bool capturing = false;

            while (!token.IsCancellationRequested)
            {
                int read = await stream.ReadAsync(buffer, 0, buffer.Length, token);
                if (read == 0) break;

                for (int i = 0; i < read; i++)
                {
                    if (!capturing && i < read - 1 &&
                        buffer[i] == 0xFF && buffer[i + 1] == 0xD8)
                    {
                        capturing = true;
                        ms.SetLength(0);
                    }

                    if (capturing)
                    {
                        ms.WriteByte(buffer[i]);

                        if (buffer[i] == 0xFF && i < read - 1 && buffer[i + 1] == 0xD9)
                        {
                            ms.WriteByte(buffer[i + 1]);
                            i++;
                            capturing = false;
                            ProcessFrame(ms.ToArray());
                        }
                    }
                }
            }
        }

        // ================= FRAME PROCESS =================
        private void ProcessFrame(byte[] data)
        {
            try
            {
                using (var ms = new MemoryStream(data))
                {
                    Bitmap bmp = new Bitmap(ms);
                    string color = DetectColor(bmp);

                    this.Invoke((Action)(() =>
                    {
                        var old = pictureBox1.Image;
                        pictureBox1.Image = bmp;
                        old?.Dispose();

                        lblDetectedColor.Text = "Color: " + color;
                    }));
                }
            }
            catch { }
}In an MJPEG stream, images are sent one after another. The ReadStream method scans the incoming data:
- When 0xFF 0xD8 is found: Start capturing bytes into a memory buffer.
- When 0xFF 0xD9 is found: The full image is ready; call
ProcessFrameto analyze it. - Reset: Clear the buffer and look for the next frame.
This lightweight approach requires no third-party libraries and works directly with raw data.
🎨 The Color Detection Algorithm (Simplified)
Once a frame is decoded, the DetectColor method analyzes the pixels using these five steps:
- Focus on the Center: The algorithm only looks at the middle 50% of the image. This ignores background noise at the edges and stays locked on your subject.
- Smart Sampling: To keep the app fast, we check every third pixel instead of every single one. This provides high accuracy without lagging the CPU.
- Convert RGB to HSV: RGB (Red, Green, Blue) is hard for computers to “name.” We convert pixels to HSV:
- Hue: The actual color angle (0–360°).
- Saturation: How vivid the color is.
- Value: How bright the color is.
- Classify Each Pixel: Using HSV, we sort pixels into categories (Red, Green, Blue, Black, or White) based on their specific ranges.
- Pick the Winner: The category with the most pixels wins! If no color fills at least 5% of the area, it returns “No clear color.”
        private string DetectColor(Bitmap bmp)
        {
            int red = 0, green = 0, blue = 0, white = 0, black = 0, total = 0;

            int startX = bmp.Width / 4;
            int endX = bmp.Width * 3 / 4;
            int startY = bmp.Height / 4;
            int endY = bmp.Height * 3 / 4;

            Rectangle rect = new Rectangle(0, 0, bmp.Width, bmp.Height);
            BitmapData bmpData = bmp.LockBits(rect, ImageLockMode.ReadOnly, PixelFormat.Format24bppRgb);
            int stride = bmpData.Stride;
            byte[] pixels = new byte[stride * bmp.Height];
            Marshal.Copy(bmpData.Scan0, pixels, 0, pixels.Length);
            bmp.UnlockBits(bmpData);

            for (int x = startX; x < endX; x += 3)
            {
                for (int y = startY; y < endY; y += 3)
                {
                    int idx = y * stride + x * 3;
                    byte b = pixels[idx];
                    byte g = pixels[idx + 1];
                    byte r = pixels[idx + 2];

                    float rf = r / 255f, gf = g / 255f, bf = b / 255f;
                    float max = Math.Max(rf, Math.Max(gf, bf));
                    float min = Math.Min(rf, Math.Min(gf, bf));
                    float delta = max - min;
                    float val = max;
                    float sat = (max < 0.001f) ? 0f : delta / max;

                    total++;

                    if (val < 0.20f) { black++; continue; }
                    if (sat < 0.15f && val > 0.75f) { white++; continue; }
                    if (sat < 0.20f) { if (val >= 0.5f) white++; else black++; continue; }

                    float hue = 0f;
                    if (delta > 0.001f)
                    {
                        if (max == rf) hue = 60f * (((gf - bf) / delta) % 6f);
                        else if (max == gf) hue = 60f * (((bf - rf) / delta) + 2f);
                        else hue = 60f * (((rf - gf) / delta) + 4f);
                        if (hue < 0) hue += 360f;
                    }

                    if (hue < 25f || hue >= 335f) red++;
                    else if (hue < 50f) red++;
                    else if (hue < 170f) green++;
                    else if (hue < 200f) green++;
                    else if (hue < 270f) blue++;
                    else red++;
                }
            }

            if (total == 0) return "No clear color";
            int maxVal = Math.Max(red, Math.Max(green, Math.Max(blue, Math.Max(white, black))));
            if (maxVal < total * 0.05f) return "No clear color";

            if (maxVal == red) return "Red";
            if (maxVal == green) return "Green";
            if (maxVal == blue) return "Blue";
            if (maxVal == white) return "White";
            if (maxVal == black) return "Black";
            return "Unknown";
        }

        // ================= HELPERS =================
        private void ShowError(string msg)
        {
            this.Invoke((Action)(() =>
            {
                MessageBox.Show(msg);
                UpdateUI(false);
            }));
}🖥️ The User Interface
The UI is designed for ease of use in a lab or factory setting.
- Thread Safety: We use
this.Invoke()to ensure the UI updates smoothly without crashing, a critical standard for Windows development. - IP & Path Controls: Easily switch between different camera setups.
- Connect/Disconnect: Safely start and stop the stream.
- Live Color Label: Updates instantly as you move objects in front of the lens.
How to Setup
- ESP32-CAM Side: Flash the standard
CameraWebServerexample from the Arduino IDE. Note down the IP address displayed in the Serial Monitor. - C# Side: * Open the project in Visual Studio.
- Enter the IP address of your ESP32.
- Select the stream path (usually
:81/stream). - Click Connect.
4. Why This Matters for Industrial IoT
In modern factories, there is a massive lack of manpower to create software for localized monitoring. While web developers are common, specialized “Factory Software” developers who understand how to interface with hardware like the ESP32 are rare. Learning how to process images locally on a PC rather than the cloud saves bandwidth and increases security.
5. Conclusion & Source Code
This project demonstrates that you don’t need expensive industrial sensors to start with machine vision. With a $10 camera and some clever C# code, you can build a functional color-sorting foundation.
Full Source Code: [Here] || Also read other Project: [ HERE ]


Discussion (0)
Share Your Thoughts