Table of Contents
A gas sensor is a device used to detect the presence of various gases in the air. These sensors are widely used in industries, homes, and vehicles to monitor the air quality and detect any gas leaks. In this article, we will explore how to interface a gas sensor with an Arduino microcontroller.
Gas Sensor:
There are various types of gas sensors available in the market, including MQ series gas sensors, carbon monoxide sensors, and methane sensors. The MQ series gas sensors are widely used as they are affordable and can detect multiple gases, including carbon monoxide, methane, propane, and alcohol.
The MQ sensors operate on the principle of resistance changes. When the gas interacts with the sensor, it changes the resistance of the sensor. The Arduino microcontroller can read this change in resistance and convert it into a voltage reading.
Gas Sensor Interface with Arduino:
Now, let’s look at how to interface a gas sensor with an Arduino microcontroller. For this example, we will use an MQ-2 gas sensor.
The concentration of the gas is measured by using the voltage divider network present in the sensor. It works on 5V.
Component Required :
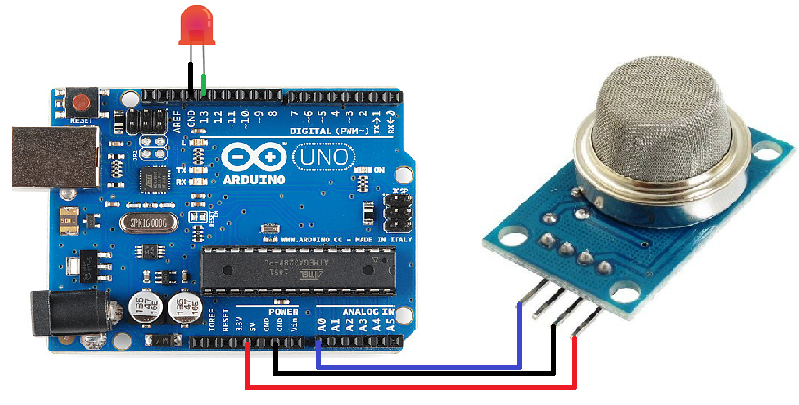
- Gas sensor (MQ-2)
- Led
- Arduino
- Jumper wires
- PC
Also read
Project Objectives :
- To design the Automation system to detect the gas.
- To be able to aware human being from harmful gas
There are 4 pins in the MQ-2 gas sensor module. we only use 3 of them , connect the pin as shown in the above circuit diagram. Analog pin to A0 of Arduino,VCC pin to 5V of Arduino and GND pin of sensor to GND pin of Arduino.

This flow chart indicate that the program have 3 step first is define pin number , second one is define the pinmode and the last one is loop section .
- Step 1-define the Pin number of the LED and sensor
int led = 13;
int sensor = A0;
- Step2 -Define the Input and Output pinMode of sensor and LED in void setup.
  pinMode(led, OUTPUT);
         pinMode(sensor, INPUT);
  Serial.begin(9600);
- Step3- In this section first off all calculate the value of the sensor using analogRead command then compare the value with 400 . If the value is greater than 400 then the LED will turn on otherwise the LED will turn OFF .
  int value = analogRead(sensor)
    Serial.print("sensor value: ");
    Serial.println(value);
if (analogSensor > 400)
{
                      digitalWrite(led, HIGH);
 }
 else
{
    digitalWrite(led, LOW);
}
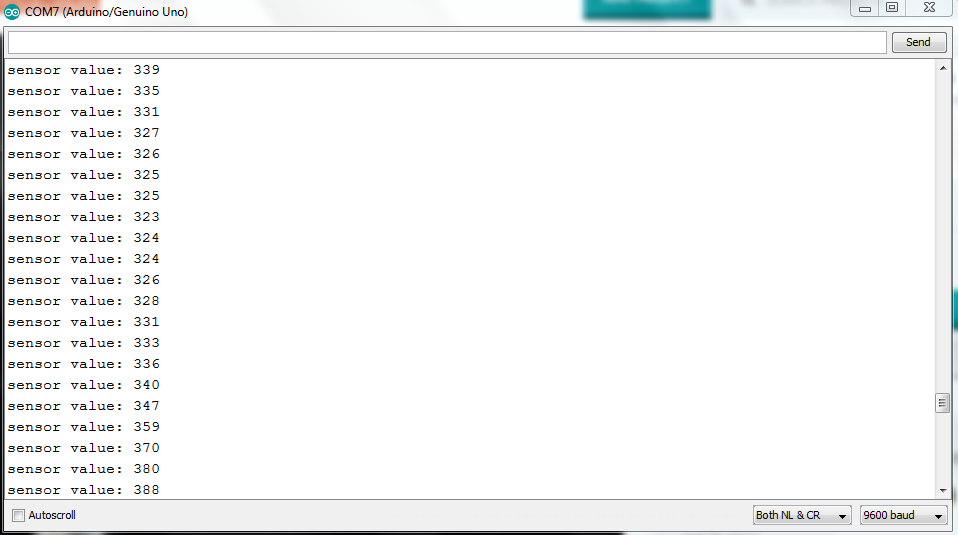
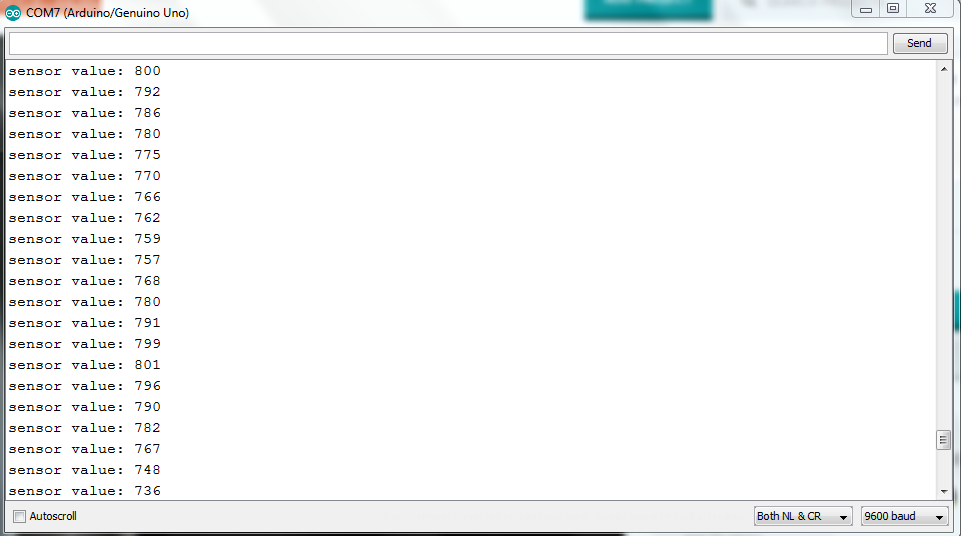
Result:- To view the result upload the program to the Arduino and open the serial monitor . When the smoke is not detect or when the LED is OFF it will show the value less than 400 . if sensor detect gas then LED turn ON and sensor value will exceed 400.
About Author
Popular Posts


Logic Gates in PLC Ladder Logic: A Beginner’s Guide
Sep 11, 2023


3 Comments
Leave a Comment