Table of Contents
1. Introduction
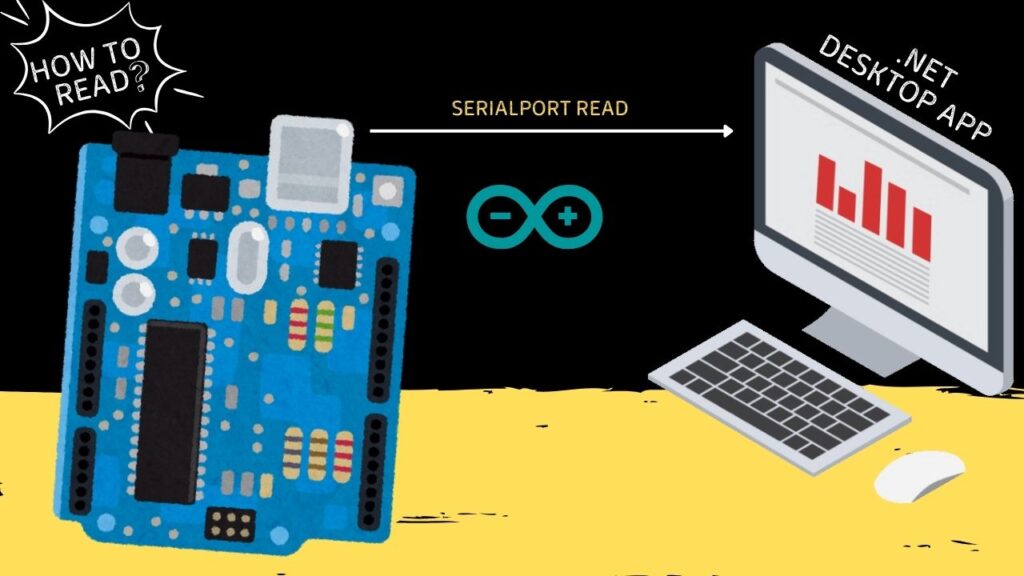
Arduino is an open-source based on easy-to-use hardware and software. Arduino boards (like Uno, Mega, Nano) contain microcontrollers (e.g., ATmega328P) that can read inputs (like sensors) and control outputs (like LEDs, motors). The Arduino IDE (Integrated Development Environment) is used to write and upload code (called sketches) to the board.
In this guide, you’ll learn:
- How to Read the sensor Data using Arduino.
- How to receive and display the Serial data in a C# desktop app.
- How to save those data to a CSV file for further analysis.
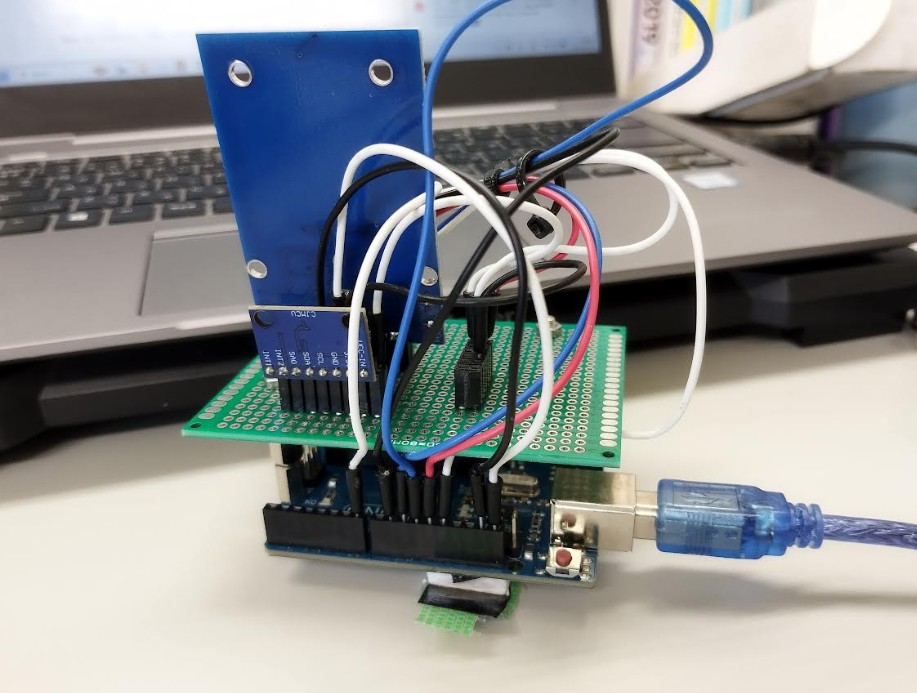
2. Project Demo
3. Hardware & Software Requirements
Hardware
- Arduino Uno/Nano
- Sensors
- USB cable
Software
- Arduino IDE
- Visual Studio (for C# app)
4. Step 1: Arduino Code (Send Sensor Data)
For Arduino Tutorials click Here
In this tutorial, we are focusing on designing the application and saving the file. You can click here for Arduino tutorials.
Things to remember: use Serial.begin(115200); and Serial.println(value);.
Serial.begin() establishes serial communication, and Serial.println() sends the value to the PC using the serial port.
Example Code
void setup() {
Serial.begin(115200); //you can use any option available
}
void loop() {
int sensorValue = analogRead(A0); // Read analog sensor
Serial.println(sensorValue);
//in this code i am using this as a sample serial data
Serial.print("RcvData koki-: 0, cmd:123, data 2343, 23344, 0,0,345,123,0,0,44,44,44,0,0,0,0,0 ");
Serial.println("OyakiData : 3450.44, 20.41,0.00,0.00,0.00");
delay(1000); // Wait 1 second
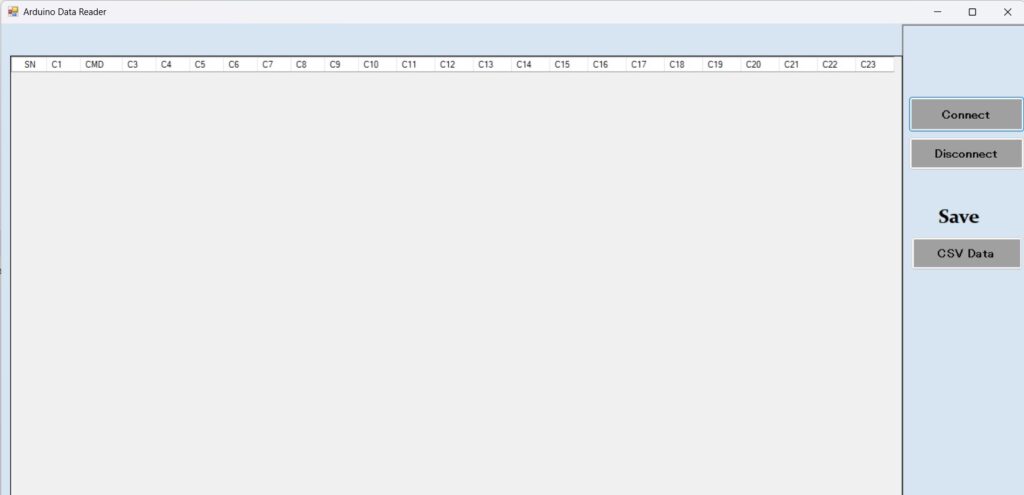
}5. Step 2: C# App (Receive & Display Data)
Set Up Serial Port
- Open Visual Studio → Windows Forms App (.NET Framework).
- Add a Buttons and datagridview(for logs) .
You can Download source code from here.
To use the serialPort and to save the data we need to this inbuilt library
using System.IO.Ports;
using System.IO;
Initialize Port
Note: Here BaudRate must be same as Arduino
 private void InitializeSerialPort()
 {
     serialPort = new SerialPort
     {
         PortName = "COM9", // ⚠️ Adjust to your port
         BaudRate = 115200,
         Parity = Parity.None,
         DataBits = 8,
         StopBits = StopBits.One,
         Handshake = Handshake.None
     };
     serialPort.DataReceived += SerialPort_DataReceived;
 }
  private void InitializeTimer()
 {
     uiUpdateTimer = new Timer
     {
         Interval = 100 // ms
     };
     uiUpdateTimer.Tick += UiUpdateTimer_Tick;
     uiUpdateTimer.Start();
 }
Connect and Disconnect button
  //connect
  private void button1_Click(object sender, EventArgs e)
  {
      try
      {
          if (!serialPort.IsOpen)
          {
              serialPort.Open();
              button1.BackColor = Color.Green;
              button3.BackColor = Color.Gray;
          }
          else
          {
              MessageBox.Show("シリアル通信されています.");
          }
      }
      catch (Exception ex)
      {
          MessageBox.Show("Error: " + ex.Message);
          button1.BackColor = Color.Red;
      }
  }
  //disconnect
   private void button3_Click(object sender, EventArgs e)
 {
     if (serialPort.IsOpen)
     {
         serialPort.Close();
         button1.BackColor = Color.Gray;
         button3.BackColor = Color.Red;
     }
 }
SerialPort Received
You can Filter the received Data according to your needs here i filter the text and display only Data.
 private void SerialPort_DataReceived(object sender, SerialDataReceivedEventArgs e)
 {
     try
     {
         string line = serialPort.ReadLine();
         serialQueue.Enqueue(line);
     }
     catch (Exception ex)
     {
         serialQueue.Enqueue("Read error: " + ex.Message);
     }
 }

 private void UiUpdateTimer_Tick(object sender, EventArgs e)
 {
     while (serialQueue.TryDequeue(out string data))
     {
         string cleaned = CleanReceivedData(data);

         if (!string.IsNullOrWhiteSpace(cleaned) && !cleaned.Trim().Equals("00") &&
             !cleaned.Trim().Equals("mode-0") && !cleaned.Trim().Equals("mode-1"))
         {
             AppendToRichTextBox(cleaned);
             UpdateDataGridView(cleaned);
         }
     }
 }

 private string CleanReceivedData(string input)
 {
     try
     {
         string cleaned = input.Replace("RcvData koki-: ", "")
                               .Replace("cmd:", "")
                               .Replace("data ", "");

         int oyakiIndex = cleaned.IndexOf("OyakiData : ");
         if (oyakiIndex < 0) return input;

         string firstPart = cleaned.Substring(0, oyakiIndex).Trim();
         string secondPart = cleaned.Substring(oyakiIndex + "OyakiData : ".Length).Trim();
         string result = $"{firstPart},{secondPart}";

         return Regex.Replace(result, @"\s*,\s*", ",");
     }
     catch
     {
         return input;
     }
 }

 private void UpdateDataGridView(string dataRow)
 {
     try
     {
         string[] values = dataRow.Split(',');

         if (values.Length == 23)
         {
             // Prepend serial number
             string[] newRow = new string[24];
             newRow[0] = serialNumber.ToString();
             for (int i = 0; i < 23; i++)
             {
                 newRow[i + 1] = values[i];
             }

             dataGridView1.Rows.Add(newRow);
             serialNumber++;

             dataGridView1.FirstDisplayedScrollingRowIndex = dataGridView1.RowCount - 1;
         }
         else
         {
             AppendToRichTextBox($"Invalid data length: {values.Length} (expected 23)");
         }
     }
     catch (Exception ex)
     {
         AppendToRichTextBox("Grid update error: " + ex.Message);
     }
 }
6. Step 3: Save Arduino Data to CSV
 private void button2_Click(object sender, EventArgs e)
 {
     try
     {
         using (SaveFileDialog saveFileDialog = new SaveFileDialog())
         {
             saveFileDialog.Filter = "CSV files (*.csv)|*.csv|All files (*.*)|*.*";// save the data to csv file
             saveFileDialog.FilterIndex = 1;
             saveFileDialog.RestoreDirectory = true;
             saveFileDialog.FileName = $"ArduinoData_{DateTime.Now:yyyyMMdd_HHmmss}.csv";

             if (saveFileDialog.ShowDialog() == DialogResult.OK)
             {
                 StringBuilder csvContent = new StringBuilder();
                 var headers = dataGridView1.Columns.Cast<DataGridViewColumn>().Select(c => c.HeaderText);
                 csvContent.AppendLine(string.Join(",", headers));

                 foreach (DataGridViewRow row in dataGridView1.Rows)
                 {
                     if (!row.IsNewRow)
                     {
                         var cells = row.Cells.Cast<DataGridViewCell>()
                                             .Select(cell => EscapeCsvValue(cell.Value?.ToString() ?? ""));
                         csvContent.AppendLine(string.Join(",", cells));
                     }
                 }

                 File.WriteAllText(saveFileDialog.FileName, csvContent.ToString());
                 MessageBox.Show($"Data saved successfully to:\n{saveFileDialog.FileName}",
                                 "Export Complete", MessageBoxButtons.OK, MessageBoxIcon.Information);
             }
         }
     }
     catch (Exception ex)
     {
         MessageBox.Show($"Error saving CSV file:\n{ex.Message}",
                         "Error", MessageBoxButtons.OK, MessageBoxIcon.Error);
     }
 }
7. Troubleshooting
- COM Port Error? Check Arduino’s port in Device Manager.
- Baud Rate Mismatch? Ensure same as Arduino’s
Serial.begin().
About Author
Popular Posts


Logic Gates in PLC Ladder Logic: A Beginner’s Guide
Sep 11, 2023


0 Comments
Be the first to comment!
Leave a Comment